DevOps
Avi on AWS: Comprehensive Installation Guide
A simplified guide to install NSX Advanced Load Balancer (Avi) on AWS to work with EKS cluster.
Introduction
VMware NSX Advanced Load Balancer (Avi) is a self-service Multi-Cloud App Services Platform that ensures consistent application delivery, with software load balancers, web application firewall (WAF), and container Ingress solutions for app’s across data centers and clouds.
Avi can be installed on multiple clouds, but the process differs based on cloud resources and services. In this blog, I have presented a simplified way to install and configure VMware NSX Advanced Load Balancer (Avi) on AWS.
Preparation
Before we start with installation, it’s good to make certain checks and perform configurations in AWS.
AWS credentials for Avi Setup
There are 2 ways to connect Avi with AWS -
- access credentials
- IAM roles
Though, access credentials for a user with sufficient privileges can be used to connect Avi with AWS, but it’s highly recommended to configure IAM roles.
Setup IAM roles
To configure Avi to use AWS resources, we have to create 2 roles with corresponding policies in AWS.
- vmimport
- AviController-Refined-Role
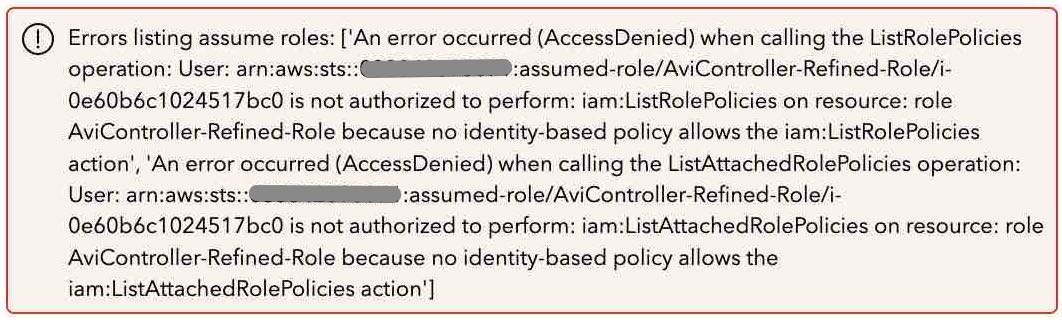
Avi team have already prepared necessary roles and policies which can be readily applied via AWS CLI or console. These roles and policies can be found in https://github.com/avinetworks/devops.git project at subpath devops/aws/iam-policies. Operator can also refer role install docs for more clarity on the roles.
IAM roles can be easily applied using below AWS CLI commands:
vmimport role :
aws iam create-role --role-name vmimport --assume-role-policy-document file://vmimport-role-trust.jsonaws iam put-role-policy --role-name vmimport --policy-name vmimport --policy-document file://vmimport-role-policy.jsonaws iam put-role-policy --role-name vmimport --policy-name AviController-vmimport-KMS-Policy --policy-document file://avicontroller-kms-vmimport.jsonFor AviController-Refined-Role role :
First, we would create the policies for the role.
aws iam create-role --role-name AviController-Refined-Role --assume-role-policy-document file://avicontroller-role-trust.jsonaws iam create-policy --policy-name AviController-EC2-Policy --policy-document file://avicontroller-ec2-policy.jsonaws iam create-policy --policy-name AviController-S3-Policy --policy-document file://avicontroller-s3-policy.jsonaws iam create-policy --policy-name AviController-IAM-Policy --policy-document file://avicontroller-iam-policy.jsonaws iam create-policy --policy-name AviController-R53-Policy --policy-document file://avicontroller-r53-policy.jsonaws iam create-policy --policy-name AviController-ASG-Policy --policy-document file://avicontroller-asg-policy.jsonaws iam create-policy --policy-name AviController-SQS-SNS-Policy --policy-document file://avicontroller-sqs-sns-policy.jsonaws iam create-policy --policy-name AviController-KMS-Policy --policy-document file://avicontroller-kms-policy.jsonNext step, would be to attach the policies to the AviController-Refined-Role role.
aws iam attach-role-policy --role-name AviController-Refined-Role --policy-arn "arn:aws:iam::<projectid>:policy/AviController-EC2-Policy"aws iam attach-role-policy --role-name AviController-Refined-Role --policy-arn "arn:aws:iam::<projectid>:policy/AviController-S3-Policy"aws iam attach-role-policy --role-name AviController-Refined-Role --policy-arn "arn:aws:iam::<projectid>:policy/AviController-R53-Policy"aws iam attach-role-policy --role-name AviController-Refined-Role --policy-arn "arn:aws:iam::<projectid>:policy/AviController-IAM-Policy"aws iam attach-role-policy --role-name AviController-Refined-Role --policy-arn "arn:aws:iam::<projectid>:policy/AviController-SQS-SNS-Policy"aws iam attach-role-policy --role-name AviController-Refined-Role --policy-arn "arn:aws:iam::<projectid>:policy/AviController-ASG-Policy"aws iam attach-role-policy --role-name AviController-Refined-Role --policy-arn "arn:aws:iam::<projectid>:policy/AviController-KMS-Policy"NOTE: In the above commands, we need to replace the
projectIdto corresponding AWS Account.
To complete the role setup, we create the instance profile for AviController-Refined-Role, which will enable role to be attach with EC2 instance.
aws iam create-instance-profile --instance-profile-name AviController-Refined-Roleaws iam add-role-to-instance-profile --instance-profile-name AviController-Refined-Role --role-name AviController-Refined-RoleAvi Sizing
Detailed sizing requirement for Avi can be referred here.
To summarize, we need following sizing for Avi controller :
- Controller: 8 vCPU cores, 24 GB RAM, and 128 GB of storage
- Service Engine: 1 vCPU cores, 2 GB RAM, and 15 GB of storage
Avi controller sizing on AWS
NSX Advanced Load Balancer recommends general purpose or compute/ memory optimized instances for running Avi Controllers.
| Size | Instance Type |
|---|---|
| Small | m4.2xlarge |
| Medium | C4.4xlarge , m4.4xlarge |
| Large | C4.8xlarge, m4.10xlarge |
Burstable instances are not recommended for running Controller virtual machines. NSX Advanced Load Balancer Controller recommends SE with minimum memory of 2 GB, and 1 vCPU.
Typical HA deployment for Avi has three Controllers. The number of SEs required depends on number of applications being served and the configured level of redundancy.
Network Requirements
NSX Advanced Load Balancer Service Engine data interfaces can be assigned to multiple VRFs (Virtual Routing and Forwarding Context).
Ports and protocol required for Avi (v22.1.4) in a restricted environment can be found here.
In case, we are looking for ports related to a different version of Avi ( in future), we can refer the VMware global ports and protocol page here.
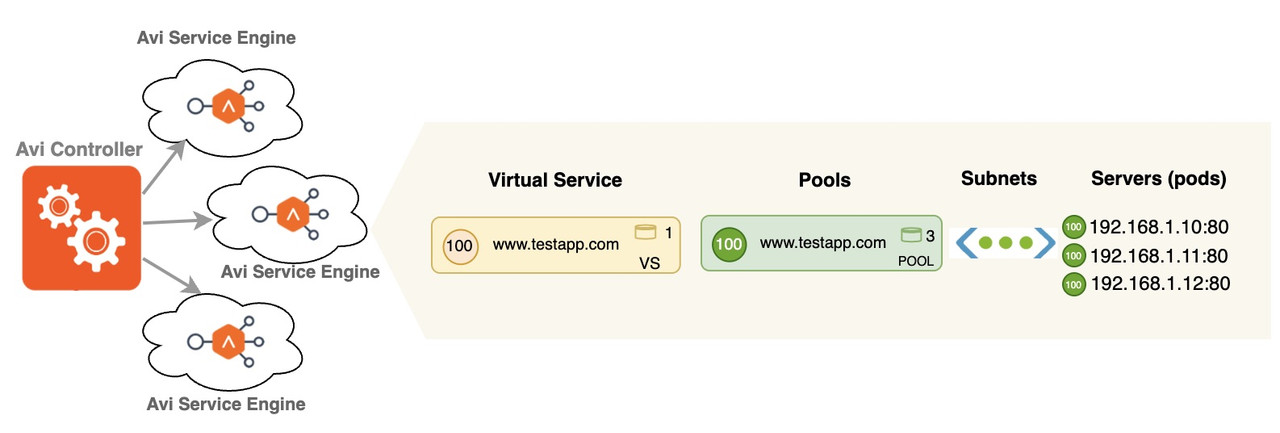
Avi Controller
Avi controller can be developed as a single EC2 instance. It can be configured with cloud setup to connect kubernetes cluster and SEs to provision virtual services.
HA cluster for Avi Controller
To deploy an Avi Controller cluster, we must deploy a single Controller node (Leader) and then optionally add the follower nodes (usually 2 nodes) to the leader. Operator can attach the follower nodes to form the cluster by navigating to Administration > Controller > Nodes and click Edit on the controller via GUI.
NSX Advanced Load Balancer Service Engines handle all data plane operations within the NSX Advanced Load Balancer by receiving and executing instructions from the Controller. It performs load balancing and all client and server-facing network interactions. SE collects real-time telemetry data from application traffic flows.
Avi Controller install process
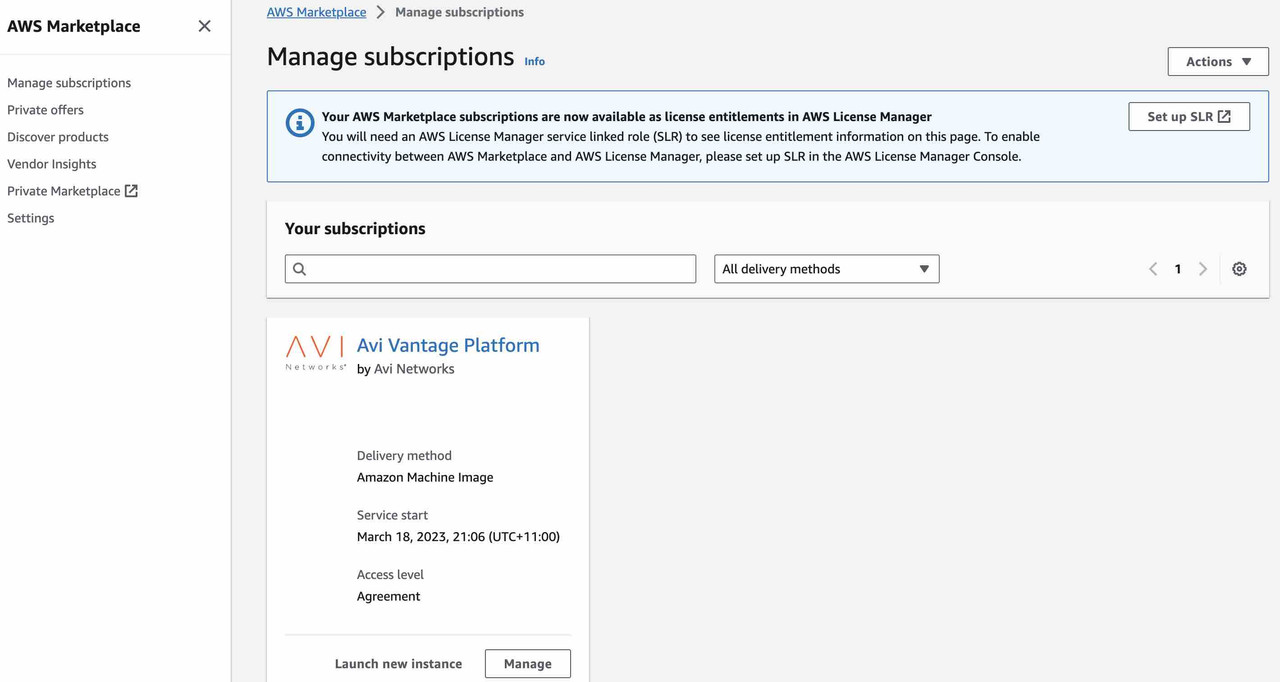
We can get the latest NSX Advanced Load Balancer AMI from AWS Marketplace.
AWS provides the manual launch (EC2 Console) process for the EC2 instance, where we can provide following information during the installation process.
- Select the AWS region for EC2
- Instance type can be m5.2xlarge ( for other compatible type, refer avi-sizing)
- Associate the instance with key-pair
- Pre-configured VPC and subnet for Avi EC2
- Auto assign public IP ( if Avi controller to be installed in public subnet).
- Security group that allows traffic through the firewall, to allow communication between the Controller and the Service Engines (SEs)
- SSH (22)
- http (80)
- https (443)
- custom-tcp (8443)
- udp (123)
- Storage 128gb or more
- Select IAM Instance profile - AviController-Refined-Role
With above configuration, Avi controller instance would start provisioning. It might take some time to get configured. Once the instance is running, we can access it’s web interface at port 443 with the assigned Public/Private IPv4 address or Public IPv4 domain.
Initial password setup
Log in to the instance with SSH using user as admin and assigned ec2 key-pair and use the sudo /opt/avi/scripts/initialize_admin_user.py script to configure the admin password for the first time login to the Controller
Initial Avi setup
Access Avi GUI and provide the passphrase password ( It’s used for Avi instance data backup setup which can be performed in later stage), DNS (optional) and save changes to move for the aws cloud setup in Avi.
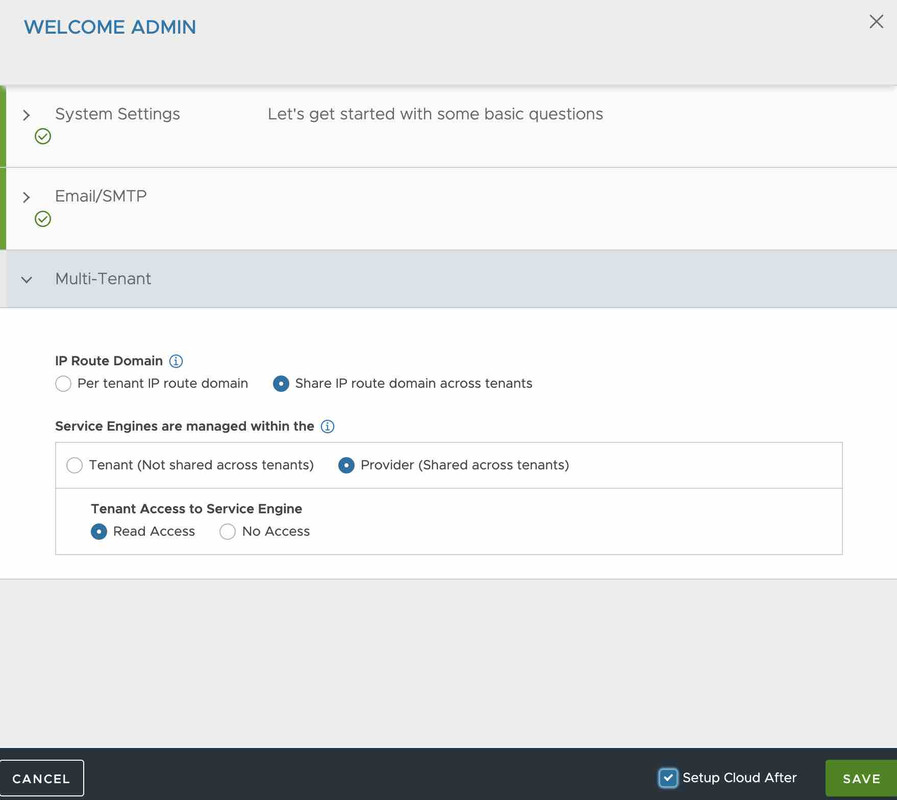
AWS Cloud Setup
Operator can navigate in GUI to infrastructure section and create a new cloud of AWS type and configure following details .
- AWS credentials ( Ensure to choose iam role option to use configured role).
- Select the AWS region
- Availability Zone & Service Engine Management Network ( we can select 1 or more AZ with subnets [private/public] which would be used to provision Service Engine instances)
- Select Use Encryption for SE S3 Bucket and Use Encryption for SE AMI/EBS volumes (Optional)
- DNS provider ( It’s recommended to select Amazon Route 53 )
Configure Avi license
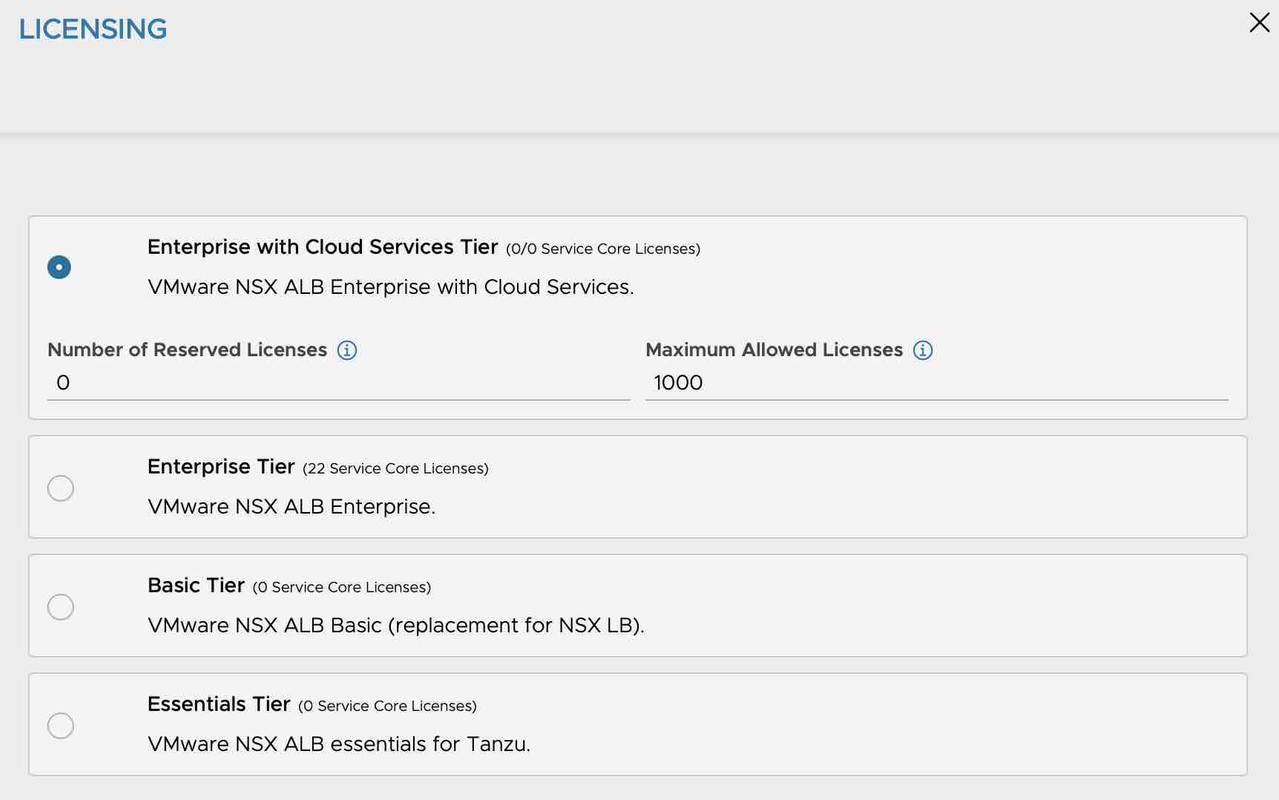
VMware NSX Tanzu customers can subscribe for Avi license based on their requirements. Avi can be configured with license key based on their entitlements. Accordingly Avi would get configured with features and required core counts. These cores would be used by Service Engine and define the usage. The details for licensing can be found here.
Operator can configure Avi’s license key for Enterprise , Basic or Essential tier by navigating to Avi console at Administration > Licensing section.
Configure Service Engine Group
Operator can navigate to infrastructure > cloud resources and verify the default SE Group for configured cloud. We can either use the default SE Group created for the aws cloud in Avi or we can create a new SE group instance. All the options and fields are pre-populated and it’s fine to start Avi SE Group with defaults. These fields can be changed later.
Once SE Group is configured, revisit cloud section and update the Template Service Engine Group option for the configured cloud in Avi.
NOTE: Default value for Service Engine Name Prefix as Avi should match to the value in S3 IAM policy. It’s recommended to leave it unchanged.
The above config would kickoff cloud config in Avi and it would temporarily put the Avi SE AMI in S3 bucket.
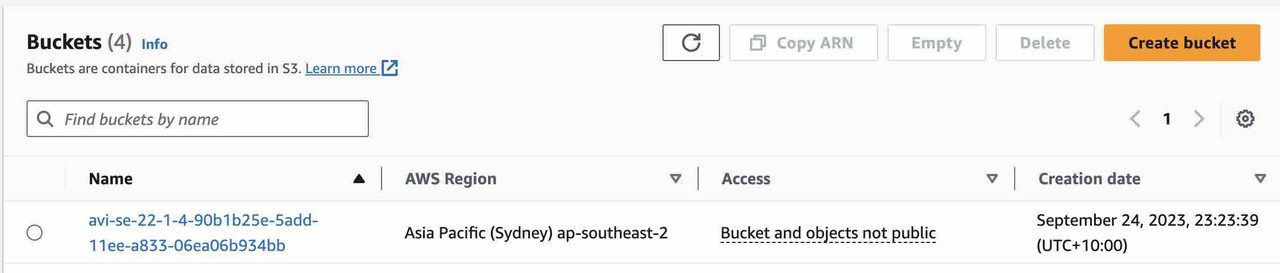
Then, the AMI would be finally saved in AWS within EC2 AMI section.

NOTE: At any point, we can verify the events under Operations section, to check for any error or task performed by Avi for configurations.
Now, Avi controller is setup with the Service Engine and can be configured for L4 and L7 use cases.
Conclusion
With the above changes, NSX Advanced Load Balancer (Avi) is configured with license for aws cloud and configurations for SE engine. These configs are sufficient to start with setting up Kubernetes cluster or services to connect with Avi.